Main Screen
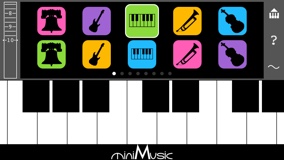
PIANO KEYBOARD
Drag the full 88-key scrolling keyboard left or right while you play. Touch the scroll bar below the keys to drag without playing or to hold the keyboard in place while you play without scrolling. Middle C is marked with our miniMusic logo; the other octaves are marked by small dots below the other C-keys. On the far left side of the keyboard is a scroll-lock switch; when scrolling is locked you will only be able to scroll by touching the scroll bar under the keyboard but not while touching the keys.
VOLUME
The master volume control is in the top left corner. Slide it up to make the audio louder, or down to make it softer. An "auto-gain" feature will sometimes adjust the volume automatically to prevent the audio from clipping (a clicking sound when the amplitude reaches the maximum).
SOUND BANK
The sound bank is centered above the keyboard. There are 8 pages of sound icons and 10 icons per page. Tap on an icon to play using that sound, the icon will get bigger when selected. Slide the bank left or right to change pages, or tap on the page indicator dots.
CONTROL BUTTONS
There are 3 buttons in the top right corner of the screen. The top PIANO button will enlarge the piano keyboard to the full height of the screen; tap the button again to shrink the piano back to half the screen. The HELP Button (the question mark) in the middle will display this help text. The EDIT button on the bottom (which looks like a wave) will open the FM synth controls to edit the current sound. On an iPad, the top PIANO button is replaced by a MENU button. On an iPhone/iPod this MENU button is only available when editing a sound and it allows you to pick a new icon for the current sound, copy or paste the sound, or revert to an earlier version of this sound (from your last session or the factory settings).
Sound Edit Screen
Tap the EDIT button (just below the HELP button) to edit the current sound. To exit the sound edit screen, tap on the sound icon that replaced the EDIT button.
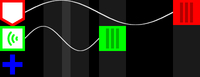
NODES
The three icons on the left, next to the volume control, are the three nodes/oscillators available for this sound. Each node can generate a frequency. Nodes have three states: on, off, and modulating. If a sound only uses one node, you may only see two icons (the third will appear once the second is turned on).
 |
This node is on and making sound. The frequency it generates is being routed to the speaker or headphones. |
 |
This node is off and is silent. Tap on the plus icon to turn it on. |
 |
This node is modulating the node below it. You cannot hear the frequency it generates directly, but it causes a rich spectrum of "side band" frequencies to emerge from the next audible node. This is the essence of FM synthesis. If the node is the same pitch as the one it is modulating (but possibly up or down one or more octaves) the side band frequencies will be close to a natural overtone/harmonic series. |
To link a node to the next, so it will modulate, touch the top node and drag down to the next. To disconnect, touch the second node and drag up to the first. To turn the last node off, touch it and drag to either side (left or right).
Each node is a different color to help you match each node with its envelope.
WAVES

To the right of each node is the sound wave it is generating. Slide the handle (the colored box) on the right side of each wave to change its wavelength. Slide it left to make the wavelength shorter and the frequency higher. Slide it to the right to make the wavelength longer and the frequency lower.
When the handle is roughly in the center of the screen it will generate the frequency being played on the piano keyboard. You can go an octave lower or two octaves higher. These octave positions are marked by dark gray vertical guidelines (they are the same width as the handle boxes). If you double tap on a handle, it will snap to the nearest octave.
Tap on the wave itself to change the type: sine wave, white noise, square wave, saw tooth, or triangle wave. A sine wave is the purest tone/frequency.
Editing Envelopes
To edit an envelope, double tap on a sound node. The envelope dials (shown below) replace the frequency sliders. To leave the Envelope Screen, tap on the check mark in the top right corner, or double tap on the current node.
ENVELOPES
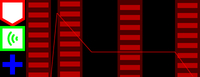
The envelope determines the shape of the sound while it is playing. There are four vertical dials to adjust the shape of the envelope (they look like tall striped rectangles that match the color of the current node). The first half of the envelope is called the "attack": what happens when your finger first touches a key. It determines how quickly the sound gets loud, how loud it gets, and whether it stays that loud, or decays to a slightly lower volume.
The next part of the envelope is the "sustain": it determines the level of each node while you are holding a note. The sustain continues for as long as you hold the note.
The last part of the envelope is the "release": what happens when you lift your finger away from the key or move to a different key. A short/fast release causes the sound to fade away immediately, a long/slow release lets it linger or resonate for a while.
ATTACK
The first dial on the left sets the volume where the attack starts. If a node is on (audible), you will usually want it to start at zero (the lowest position) unless you want to hear a click when it begins. You can start a modulating node higher without hearing a click.
The second dial adjusts the shape of the attack. In addition to sliding up and down to set the level, you can also move the dial left or right to adjust the timing. The time scale grows exponentially from about a millisecond to about 3 seconds.
SUSTAIN
The third dial sets the sustain level, but it can also move left or right to further shape the timing of the attack/decay. The length of the flat sustain line is unimportant; the level will hold as long as your finger is on the key.
RELEASE
The last dial, furthest to the right, sets the duration of the release. It always drops to zero, otherwise the sound might never end, though this may not be shown on the screen for slow/long releases. The longer the release, the longer the note continues to play after you lift your finger. If you create a sound with a long release, you should be careful how many notes are playing at once.
|